
► API 註冊與取得相關 key
► 需要套件
初始化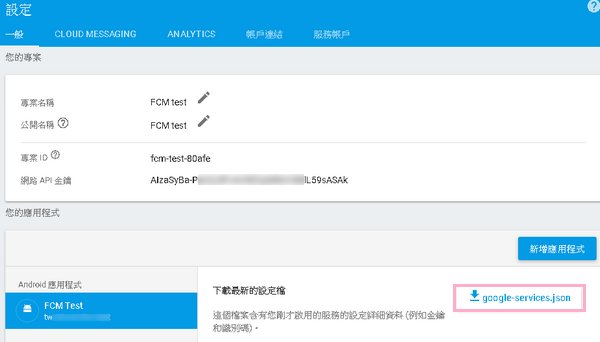 ► MyFirebaseInstanceIDService 當token初次產生或異動時觸發

android-support-annotations.jar,android-support-compat.jar,android-support-core-ui.jar,android-support-core-utils.jar,android-support-fragment.jar,android-support-media-compat.jar,android-support-v4.jar,google-firebase-common.jar,google-firebase-iid.jar,google-firebase-messaging.jar,google-play-services-basement.jar(含res),google-play-services-tasks.jar
Android Studio 提供引入為 aar, Eclipse 可至網站下載相關jar,下載 Google Firebase libraries for Eclipse
► 權限
Android Studio 提供引入為 aar, Eclipse 可至網站下載相關jar,下載 Google Firebase libraries for Eclipse
<uses-permission android:name="android.permission.ACCESS_NETWORK_STATE" />
<uses-permission android:name="android.permission.INTERNET" />
<uses-permission android:name="android.permission.WAKE_LOCK" />
<uses-permission android:name="com.google.android.c2dm.permission.RECEIVE" />
<permission android:name="tw.shioulo.fcm.test.permission.C2D_MESSAGE" android:protectionLevel="signature" />
<uses-permission android:name="PackageName.permission.C2D_MESSAGE" />
► 相關宣告
<uses-permission android:name="android.permission.INTERNET" />
<uses-permission android:name="android.permission.WAKE_LOCK" />
<uses-permission android:name="com.google.android.c2dm.permission.RECEIVE" />
<permission android:name="tw.shioulo.fcm.test.permission.C2D_MESSAGE" android:protectionLevel="signature" />
<uses-permission android:name="PackageName.permission.C2D_MESSAGE" />
<receiver android:name="com.google.firebase.iid.FirebaseInstanceIdReceiver"
android:exported="true" android:permission="com.google.android.c2dm.permission.SEND" >
<intent-filter>
<action android:name="com.google.android.c2dm.intent.RECEIVE" />
<action android:name="com.google.android.c2dm.intent.REGISTRATION" />
<category android:name="PackageName" />
</intent-filter>
</receiver>
<receiver android:name="com.google.firebase.iid.FirebaseInstanceIdInternalReceiver" android:exported="true" />
<meta-data android:name="com.google.android.gms.version"
android:value="@integer/google_play_services_version" />
<service
android:name=".MyFirebaseMessagingService">
<intent-filter>
<action android:name="com.google.firebase.MESSAGING_EVENT"/>
</intent-filter>
</service>
<service
android:name=".MyFirebaseInstanceIDService">
<intent-filter>
<action android:name="com.google.firebase.INSTANCE_ID_EVENT"/>
</intent-filter>
</service>
► 程式android:exported="true" android:permission="com.google.android.c2dm.permission.SEND" >
<intent-filter>
<action android:name="com.google.android.c2dm.intent.RECEIVE" />
<action android:name="com.google.android.c2dm.intent.REGISTRATION" />
<category android:name="PackageName" />
</intent-filter>
</receiver>
<receiver android:name="com.google.firebase.iid.FirebaseInstanceIdInternalReceiver" android:exported="true" />
<meta-data android:name="com.google.android.gms.version"
android:value="@integer/google_play_services_version" />
<service
android:name=".MyFirebaseMessagingService">
<intent-filter>
<action android:name="com.google.firebase.MESSAGING_EVENT"/>
</intent-filter>
</service>
<service
android:name=".MyFirebaseInstanceIDService">
<intent-filter>
<action android:name="com.google.firebase.INSTANCE_ID_EVENT"/>
</intent-filter>
</service>
初始化
@Override
protected void onCreate(Bundle savedInstanceState) {
    super.onCreate(savedInstanceState);
    setContentView(R.layout.activity_main);
    //
    if (getIntent().getExtras() != null) {
        for (String key : getIntent().getExtras().keySet()) {
            Object value = getIntent().getExtras().get(key);
            Log.d("dd", "Key: " + key + " Value: " + value);
        }
    }
    //參數資料來自 firebase 後台的 <strong>google-services.json</strong>
    if(FirebaseApp.getApps(this).isEmpty()) {
        FirebaseOptions.Builder builder = new FirebaseOptions.Builder();
        builder.setApiKey("AIzaSyD88cqipxxxxxTop_0f03gjPExxxxxxV5Lk");//client/api_key/current_key
        builder.setApplicationId("1:814xxxxxx498:android:9f8d7fxxxxxxeb6c8");//client/client_info/mobilesdk_app_id
        builder.setDatabaseUrl("https://fcm-xxxxxx.firebaseio.com");//project_info/firebase_url
        builder.setGcmSenderId("8145xxxxxx98");//project_info/project_number
        builder.setStorageBucket("fcm-xxxxxx.appspot.com");//project_info/storage_bucket
        FirebaseOptions options = builder.build();
        FirebaseApp.initializeApp(this, options);
    }
    String refreshedToken = FirebaseInstanceId.getInstance().getToken();
    Log.d("dd","Token:"+refreshedToken);
}
import android.util.Log;
import com.google.firebase.iid.FirebaseInstanceId;
import com.google.firebase.iid.FirebaseInstanceIdService;

public class MyFirebaseInstanceIDService extends FirebaseInstanceIdService {
    /**
     * Called if InstanceID token is updated. This may occur if the security of
     * the previous token had been compromised. Note that this is called when the InstanceID token
     * is initially generated so this is where you would retrieve the token.
     */
    // [START refresh_token]
    @Override
    public void onTokenRefresh() {
        // Get updated InstanceID token.
        String refreshedToken = FirebaseInstanceId.getInstance().getToken();
        Log.d("dd", "[Refreshed token]: " + refreshedToken);

        // If you want to send messages to this application instance or
        // manage this apps subscriptions on the server side, send the
        // Instance ID token to your app server.
        sendRegistrationToServer(refreshedToken);
    }
    // [END refresh_token]
    /**
     * Persist token to third-party servers.
     *
     * Modify this method to associate the user's FCM InstanceID token with any server-side account
     * maintained by your application.
     */
    private void sendRegistrationToServer(String token) {
        // TODO: Implement this method to send token to your app server.
    }
}
► MyFirebaseMessagingService 收到推播訊息時觸發, 但又會因訊息格式及app是否處於前景狀態而有所差異
import android.app.NotificationManager;
import android.app.PendingIntent;
import android.content.Context;
import android.content.Intent;
import android.media.RingtoneManager;
import android.net.Uri;
import android.support.v4.app.NotificationCompat;
import android.util.Log;

import com.google.firebase.messaging.FirebaseMessagingService;
import com.google.firebase.messaging.RemoteMessage;

public class MyFirebaseMessagingService extends FirebaseMessagingService {

    private static final String TAG = "dd";

    //Called when message is received.
    // [START receive_message]
    @Override
    public void onMessageReceived(RemoteMessage remoteMessage) {
        // [START_EXCLUDE]
        // There are two types of messages data messages and notification messages. Data messages are handled
        // here in onMessageReceived whether the app is in the foreground or background. Data messages are the type
        // traditionally used with GCM. Notification messages are only received here in onMessageReceived when the app
        // is in the foreground. When the app is in the background an automatically generated notification is displayed.
        // When the user taps on the notification they are returned to the app. Messages containing both notification
        // and data payloads are treated as notification messages. The Firebase console always sends notification
        // messages. For more see: https://firebase.google.com/docs/cloud-messaging/concept-options
        // [END_EXCLUDE]

        // Handle FCM messages here.
        // Not getting messages here? See why this may be: https://goo.gl/39bRNJ
        Log.d(TAG, "[From]: " + remoteMessage.getFrom());

        // Check if message contains a data payload.
        if (remoteMessage.getData().size() > 0) {
            Log.d(TAG, "[Message data]: " + remoteMessage.getData());
            String data = remoteMessage.getData().get("message");

            if (/* Check if data needs to be processed by long running job */ true) {
                // For long-running tasks (10 seconds or more) use Firebase Job Dispatcher.
                //scheduleJob();
            } else {// Handle message within 10 seconds
                handleNow();
            }
        }

        // Check if message contains a notification payload.
        if (remoteMessage.getNotification() != null) {
            RemoteMessage.Notification noti = remoteMessage.getNotification();
            String body = noti.getBody();
            String title = noti.getTitle();
            Log.d(TAG, "[Message Notification]:  Body=" + noti.getBody());
            //sendNotification(title, body);
        }

        // Also if you intend on generating your own notifications as a result of a received FCM
        // message, here is where that should be initiated. See sendNotification method below.
    }
    // [END receive_message]

    //Handle time allotted to BroadcastReceivers.
    private void handleNow() {
        Log.d(TAG, "Short lived task is done.");
    }

    //Create and show a simple notification containing the received FCM message.
    private void sendNotification(String title, String messageBody) {
        Intent intent = new Intent(this, MainActivity.class);
        intent.addFlags(Intent.FLAG_ACTIVITY_CLEAR_TOP);
        PendingIntent pendingIntent = PendingIntent.getActivity(this, 0 /* Request code */, intent, PendingIntent.FLAG_ONE_SHOT);
        Uri defaultSoundUri= RingtoneManager.getDefaultUri(RingtoneManager.TYPE_NOTIFICATION);
        NotificationCompat.Builder notificationBuilder = new NotificationCompat.Builder(this)
                .setSmallIcon(R.drawable.ic_launcher)
                .setContentTitle(title)
                .setContentText(messageBody)
                .setAutoCancel(true)
                //.setSound(defaultSoundUri)
                .setContentIntent(pendingIntent);
        NotificationManager notificationManager = (NotificationManager) getSystemService(Context.NOTIFICATION_SERVICE);
        notificationManager.notify(0 /* ID of notification */, notificationBuilder.build());
    }
}
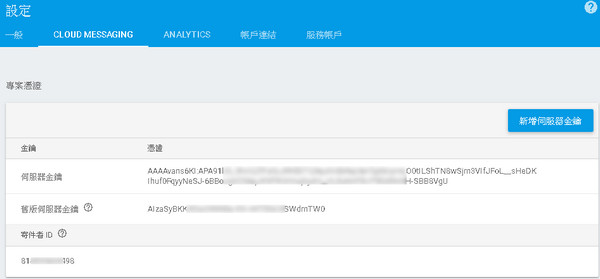
► PHP Server
#API access key from Google API's Console
$id = 'eYyA5XLg.................................eIvsiTPil4OOJD';
// API access key from Google API's Console
define( 'API_ACCESS_KEY', 'AAAAvans6KI:APA91......................SBB8VgU' );
$registrationIds = array($id); //$id is string not array
// prep the bundle
//讓 android 主動發出通知訊息用
$notification = array
(
    'title' => '標題title', 'body' => '內容body', 'icon' => 'logo',
    'sound' => 'default', 'tag' => 'tag', 'color' => '#ffffff'
);
//資料格式自定義
$data = array
(
    'message' => 'message body',
    'click_action' => "PUSH_INTENT"
);
$fields = array
(
    'registration_ids'  => $registrationIds,
    'notification'      => $notification,
    'data'              => $data,
    'priority'          => 'normal'
);
$headers = array
(
    'Authorization: key=' . API_ACCESS_KEY,
    'Content-Type: application/json'
);

$ch = curl_init();
curl_setopt( $ch,CURLOPT_URL, 'https://fcm.googleapis.com/fcm/send' );
curl_setopt( $ch,CURLOPT_POST, true );
curl_setopt( $ch,CURLOPT_HTTPHEADER, $headers );
curl_setopt( $ch,CURLOPT_RETURNTRANSFER, true );
curl_setopt( $ch,CURLOPT_SSL_VERIFYPEER, false );
curl_setopt( $ch,CURLOPT_POSTFIELDS, json_encode( $fields ) );
$result = curl_exec($ch );
curl_close( $ch );
echo $result;
► android 觸發說明
server端推播資料是否包含 'notification' => $notification 這組資料對 android client將有所影響,
當包含時
當包含時
若 app處於背景狀態下, 則系統會主動發出通知訊息告知使用者, 但onMessageReceived()不會觸發, 直到使用者點選訊息啟動 app時則 $data 的資料會封裝在 intent 內供程式讀取.
若 app處於前景狀態下, 系統不會主動發出通知, 但 onMessageReceived()則會被觸發供程式處理.
若 app處於前景狀態下, 系統不會主動發出通知, 但 onMessageReceived()則會被觸發供程式處理.
不包含時
則 onMessageReceived()不論 app在前景或背景均會被觸發, 是否發出通知訊息則需自行處理.
